
Download Cinebench Instantly
- Cinebench 2026 – Latest version with CPU + GPU testing
- Cinebench 2024 – Modern benchmark with Redshift GPU support
- Cinebench R23 – Lightweight and ideal for older PCs
Pick the version that fits your system and start testing your PC performance right away:
Cinebench is a free tool that shows how fast your CPU and GPU are. It uses real 3D scenes, like the ones used in movies.
Many PC builders, reviewers, and everyday users trust it. It gives clear and steady scores for your computer.
You can use it to test a new PC, compare parts, or find out why your computer feels slow. In just a few minutes, Cinebench shows how your system performs.
Available for Windows, macOS, and ARM-based devices.
👉 Save your version now and check your PC speed.
Key Features
✔ CPU single-core & multi-core testing
✔ GPU benchmarking (latest versions)
✔ Cross-platform support for Windows, macOS, and ARM
✔ Fast and repeatable results
✔ Free and safe to use
Why Use Cinebench
Real-World Testing
Uses advanced 3D rendering to simulate real workloads, not synthetic tests.
Industry Standard
Widely used by professionals, reviewers, and system builders.
Accurate Performance Insights
Measure CPU and GPU performance with consistent scoring.
Cross-Platform Compatibility
Test systems across Windows, macOS, and ARM devices.
Quick and Simple
Run a test in minutes with no complex setup.
About Cinebench
Cinebench is a simple tool to test your computer speed. It checks how well your CPU and GPU perform.
Instead of fake tests, it runs real 3D scenes like those used in movies. This shows how your system handles heavy tasks in real life.
You can test your CPU in single-core and multi-core modes. This makes it easy to compare different processors.
New versions also include GPU tests, so you can check graphics performance too.
The results are clear and reliable, which is why many reviewers, students, and professionals trust it.
Core Capabilities
Real 3D Rendering Engine
Simulates real workloads for accurate performance measurement.
CPU Performance Testing
Evaluate both single-core speed and multi-core power.
GPU Benchmarking
Measure modern graphics performance in supported versions.
Repeatable Results
Consistent scoring for fair comparisons across systems.
Performance & Stability Checks
Identify thermal limits, throttling, and system bottlenecks.
Fast Setup
Install and run tests within minutes, no cost involved.
Get Started
Cinebench makes performance testing simple.
Download the version you need, run the test, and get a clear score that shows exactly how your system performs.
👉 Start now and see what your PC is capable of.
Download from the Microsoft Store (Windows)
This is the easiest and safest way for Windows users. Microsoft checks every app before it goes live in the store. So you know exactly what you are getting.
- Open the Microsoft Store on your Windows PC
- Type Cinebench in the search bar
- Look for the listing published by MAXON Computer GmbH
- Click Get or Install
- Windows will handle the rest automatically
That is it. No installer to run manually. No settings to figure out. It just downloads and installs on its own. You can also use the same Microsoft account to install it on up to ten different Windows devices.
Download from the Maxon Official Website
If you are on macOS or you prefer downloading directly from the people who built Cinebench, this is the right method for you.
- Open your browser and go to maxon.net
- Find the software page on the website
- Choose your version. Latest version is very good. R23 and 2024 are also available if you need them
- Select your operating system, either Windows or macOS
- Click the download button and save the file to your computer
After the file is saved, do one quick thing before opening it. Maxon publishes a checksum right next to every download link.
A checksum is just a short code that acts like a fingerprint for the file. Compare the checksum of your downloaded file with the one Maxon shows on the page. If they match, your file is genuine, complete, and safe to use. It takes about one minute and gives you total peace of mind.
Not Sure Which Version to Get
Here is a simple guide:
You’re new, so use Cinebench 2026 for any modern PC or Mac, pick 2024 to compare with older benchmark results, and go with R23 for older systems or long-term score tracking.
If you are not sure, just go with newest version. It is the latest and works on most modern systems.
Which Download Method Should You Choose
- If you are on Windows, use the Microsoft Store. It is faster and simpler.
- Also if you are on macOS or want a specific older version, use the Maxon website.
- Or just use our download page at the top. Everything is already sorted for you in one place.
- Either way you are getting the real Cinebench, trusted by millions of users around the world.
Here is what Cinebench measures
- Single-core test: measures the speed of one CPU core working alone
- Multi-core test: measures total CPU power when all cores run together
- GPU test: measures how quickly your graphics card renders a 3D scene (available in 2024 and 2026 variants only)
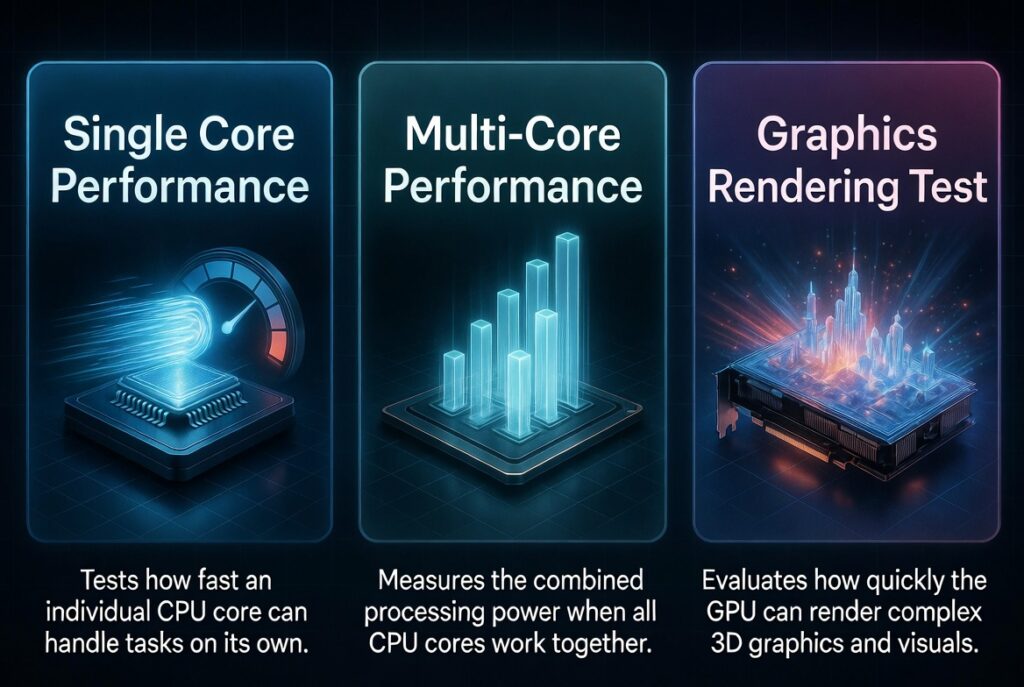
These three scores give you a clear picture of your system’s real performance.
Cinebench Versions Explained: R23 vs 2024 vs 2026
Before downloading anything, you need to pick the right version.
Three versions are commonly used today, and each serves a slightly different purpose.
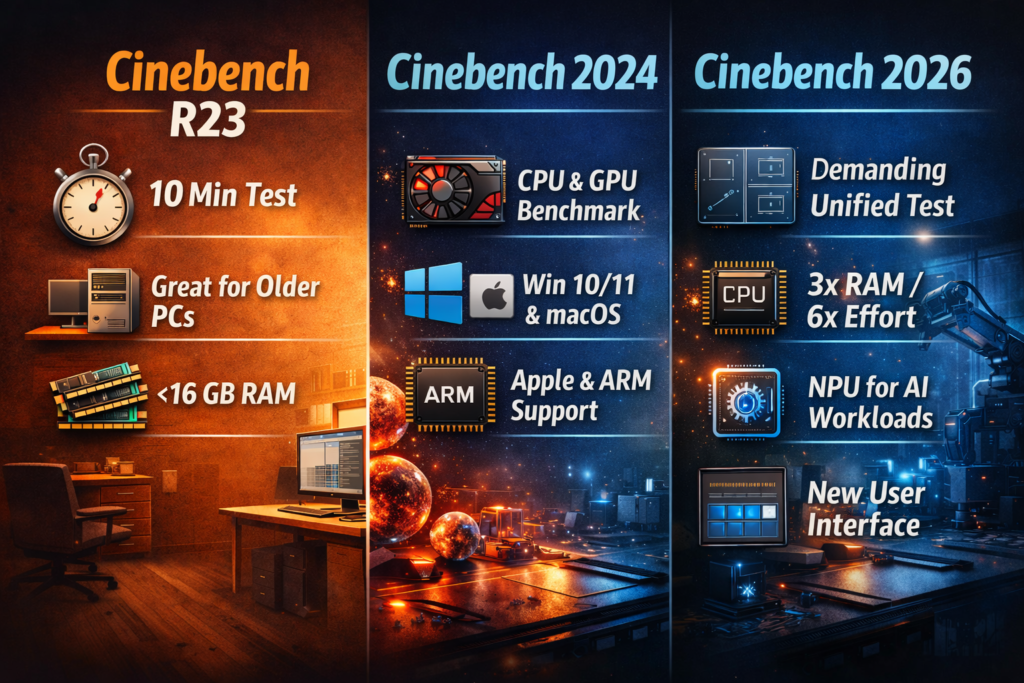
Cinebench R23
Released in late 2020, R23 became the standard benchmark for several years. It introduced a minimum 10-minute test duration for the multi-core test, which made results more reliable by preventing short bursts of high performance from inflating scores.
R23 is still widely used because it runs well on older systems and has a massive database of scores available for comparison. If your PC is a few years old or has less than 16 GB of RAM, R23 is a practical and reliable choice.
Cinebench 2024
The 2024 version raised the difficulty significantly. It brought GPU benchmarking back using the Redshift render engine, which is Maxon’s professional GPU renderer used by studios worldwide. This was a major update because it gave users a single app to test both their CPU and GPU.
The 2024 version requires Windows 10/11 (64-bit) or macOS 11.7 and above, with 16 GB of RAM recommended. It also supports ARM-based devices, which means Apple Silicon Macs (M1, M2, M3, M4) are fully supported.
Cinebench 2026
It is the newest and most demanding version available. Key improvements include:
- A unified scene used for both CPU and GPU testing, making comparisons more meaningful
- Three times the memory footprint compared to R23
- Six times the computational effort compared to R23
- Support for newer CPU instruction sets, which rewards modern hardware
- NPU (Neural Processing Unit) testing for AI-accelerated workflows
- A completely redesigned user interface
System requirements for Cinebench 2026: minimum 12 GB RAM (16 GB recommended), at least 6 GB of video memory for the GPU test, a processor with AVX2 support (most CPUs from 2013 onward qualify), and Windows 10 version 10240 or higher.
Which Version Should You Pick?
Use R23 if your PC is older or has limited RAM. Use Cinebench 2024 or 2026 if your system is modern and you want CPU plus GPU testing. Use new one specifically if you want to compare your results against the latest hardware reviews and professional benchmarks.
One critical point: scores from different versions cannot be compared directly. A score of 20,000 in R23 and a score of 20,000 in Cinebench 2026 do not represent the same level of performance. Always compare scores within the same version.
System Requirements at a Glance
| Version | Min RAM | Rec RAM | VRAM | OS |
|---|---|---|---|---|
| R23 | 4 GB | 8 GB | None | Win 10+, macOS 10.13+ |
| 2024 | 8 GB | 16 GB | 4 GB+ | Win 10+, macOS 11.7+ |
| 2026 | 12 GB | 16 GB | 6 GB | Win 10+, macOS 11.7+ |
How to Install Cinebench on Windows Step by Step
Installing on Windows is straightforward and takes only a few minutes.
Microsoft Store installation: After clicking “Get,” the app downloads and installs automatically. No extra steps are needed. Find Cinebench in your Start Menu once it finishes.
Website installer installation:
- Locate the downloaded installer file in your Downloads folder
- Double-click the file to launch the setup wizard
- Follow the on-screen prompts, which take less than two minutes
- Find application in your Start Menu after installation completes
- Right-click and choose “Run as administrator” if you want maximum system access (optional)
No special drivers or additional software are required. Cinebench works with what is already installed on your system.
How to Install Cinebench on macOS Step by Step
Mac users can download software from the Mac App Store or directly from Maxon’s website.
Steps for macOS installation:
- Open the Mac App Store and search “Cinebench,” or visit maxon.net directly
- Download the version that matches your macOS and chip (Intel or Apple Silicon)
- Open the saved file
- Drag the app into your Applications folder
- Now open it from your Applications folder to launch it
Apple Silicon Mac users (M1 through M4) will find that Cinebench runs natively and delivers impressive scores. Apple’s chips are highly efficient and perform exceptionally well in both single-core and multi-core tests.
How to Run the CPU Single-Core Test
The single-core test measures how fast one core of your CPU handles a single task.
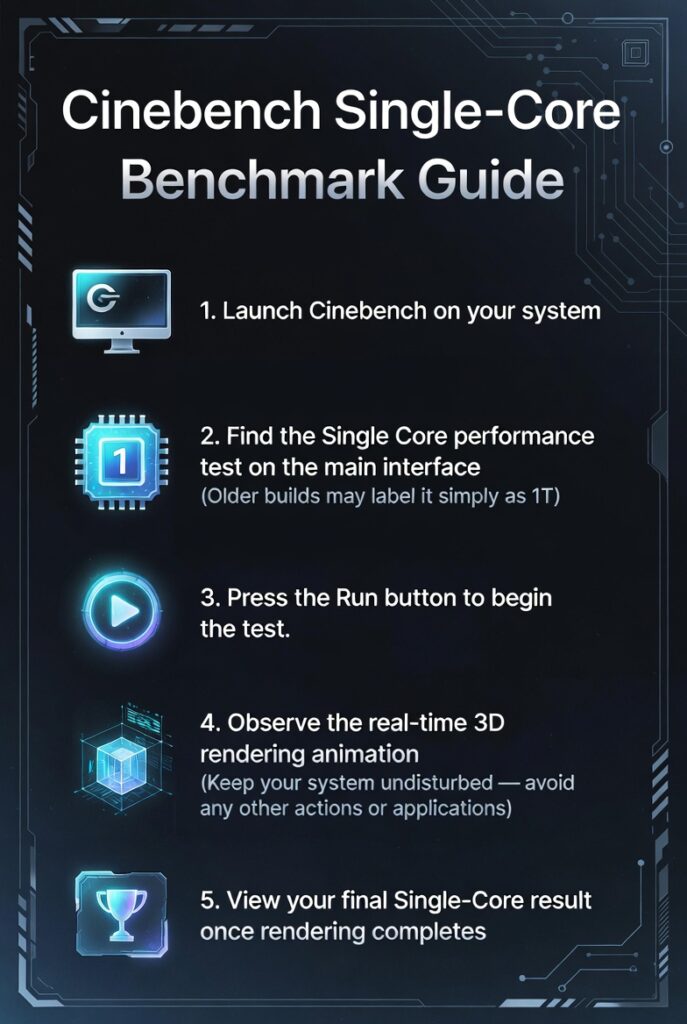
This matters for everyday computing like web browsing, gaming (many games are heavily single-core dependent), and launching applications.
Steps to run the single-core test:
- Open Cinebench on your computer
- Look for “CPU (Single Core)” on the main screen. In older versions this may appear as “1T” (1 thread)
- Click the “Run” button next to it
- Watch as a 3D scene renders progressively on your screen
- Do not click anything or open other programs during this process
- Your single-core score appears on screen when the render finishes
The test typically takes between one and two minutes to complete. The 3D scene rendering in front of you is your CPU doing real computational work, not a simulation.
Understanding your single-core score: In Cinebench R23, a score between 1,500 and 2,000 points is considered strong for modern processors. In 2026 version, the scoring scale is completely different due to the much heavier workload, so always check comparison charts specific to the version you are running.
How to Run the CPU Multi-Core Test
The multi-core test pushes every core and thread in your CPU at the same time. This reflects performance in demanding tasks such as video editing, 3D rendering, compiling software code, and handling multiple heavy programs simultaneously.
Steps to run the multi-core test:
- Open Cinebench
- Find “CPU (Multi Core)” on the main screen. Older versions label this “nT” where n equals the number of threads your CPU has
- Click “Run”
- The same 3D scene renders, but every CPU core works on it simultaneously
- The test completes faster than single-core because the workload is divided across all cores
- Your multi-core score appears when it finishes
Important note for R23 users: The default multi-core test runs for a minimum of 10 minutes. This is by design. The extended duration reveals whether your CPU can hold its performance under sustained load without slowing down due to heat.
Score ranges to expect in Cinebench R23:
- 6-core CPU: roughly 10,000 to 14,000 points
- 12-core CPU: roughly 18,000 to 26,000 points
- 16-core CPU: roughly 25,000 to 35,000 points
- High-end workstation CPUs: 50,000 points and above
In Cinebench 2026, scores are substantially higher across the board because the workload is six times more demanding.
How to Run the GPU Redshift Test
The GPU test is available in Cinebench 2024 and 2026. It uses the Redshift render engine to measure how quickly your graphics card renders a complex 3D scene using GPU acceleration.
Before running this test, confirm you have at least 6 GB of video memory on your GPU. Without sufficient VRAM, the test may fail or give inaccurate results.
Steps to run the GPU test:
- Open Cinebench 2024 or 2026
- Locate the GPU test option on the main screen (labeled “GPU” or “Redshift” depending on the version)
- Click “Run”
- Your GPU processes the scene using thousands of small parallel cores
- The score appears in points when the render is complete
Who benefits most from the GPU test: 3D artists using Redshift, OctaneRender, or similar GPU renderers. Video editors working in DaVinci Resolve or After Effects with GPU-accelerated effects. Anyone considering a GPU upgrade for creative work and wanting to measure the real-world improvement.
Entry-level GPUs typically score a few hundred points. High-end GPUs such as the NVIDIA RTX 4090 or AMD RX 7900 XTX score in the thousands. As with CPU scores, always compare GPU scores within the same Cinebench version.
How to Read and Understand Your Scores
Getting a score is only half the picture. Understanding what each score tells you about your system is where the real value comes from.
Single-core score
Reflects the raw speed of one CPU core. Directly impacts gaming frame rates, app responsiveness, and how quickly your operating system feels to use day to day.
Multi-core score
Reflects total CPU throughput when all cores are active. Directly impacts how fast you can render a video, export a photo project, compile code, or run multiple demanding apps at the same time.
GPU score
Reflects how quickly your graphics card handles GPU-accelerated rendering. Relevant primarily for creative professionals using GPU-based renderers rather than for gaming performance.
What is a good Cinebench score for CPU?
A good Cinebench score depends on what you use your computer for. Here’s a simple breakdown:
What Score Should You Aim For:
- 🎮Gamers → 15,000 or higher
- 🎨 Video Editors & Creators → 20,000 or higher
- 🖥️ Professionals & Servers → 40,000 or higher
How to Compare Your Cinebench Scores with Others
After running the test, you naturally want to know if your score is good.
The easiest way is to search for your exact processor or graphics card model followed by “application” and the version you used.
Reliable websites like Nanoreview, CPU Benchmark, and tech review sites show real user results. Remember that scores from different versions cannot be compared directly.
How to compare your scores with others
Search your CPU or GPU model name followed by “Cinebench score” in any search engine. Websites such as Nanoreview, CPU Benchmark, and Tom’s Hardware publish scores for hundreds of processors across all three versions. This lets you quickly see where your hardware stands relative to competing options.
Some versions of app also display a reference bar inside the app itself, showing how your score compares to a baseline system chosen by Maxon.
Tips for Getting Accurate and Repeatable Results
Your score can vary based on conditions in your system. Following these steps helps you get results that are consistent and trustworthy.
Close all background applications before testing
Web browsers, music players, chat apps, and cloud sync tools all consume CPU resources. Closing them before running Cinebench gives your CPU full headroom to perform.
Pause antivirus scans
Some antivirus programs run background scans that consume significant CPU cycles. Pause real-time scanning temporarily while benchmarking, then re-enable it afterward.
Let your PC reach a stable temperature first
If the system was just powered on, wait five minutes. If it just finished heavy work, let it cool down for ten minutes. Temperature has a direct impact on performance.
Run each test two or three times
Compare the scores across runs. If results vary widely, something is interfering. Consistent scores across multiple runs indicate a stable, healthy system.
Keep your hands off the keyboard and mouse during the test
Any additional input adds workload to your system and pulls resources away from the benchmark.
Plug in laptops before testing
Laptops in battery mode apply power limits that significantly reduce CPU performance. Always run benchmarks while plugged in for accurate scores.
Set Windows power mode to Balanced or High Performance
Power Saver mode throttles your CPU intentionally. Check your power settings in Windows before running any benchmark.
Cinebench 2026 Command Line Usage (For Advanced Users)
You can run Cinebench without opening the graphical interface. This is especially useful for automated testing, overclocking loops, and server benchmarking.
How to use it:
- Open Command Prompt or PowerShell as Administrator.
- Navigate to the Cinebench folder using the cd command.
- Use these example commands:
- Cinebench.exe -cpu → Runs the multi-core test
- Cinebench.exe -singlecore → Runs the single-core test
- Cinebench.exe -gpu → Runs the GPU test
- Add the -log parameter to automatically save results to a text file.
This command-line method makes it easy to run multiple tests automatically or integrate Cinebench into custom scripts. Official documentation on these options is available on the Maxon website.
How to Use Cinebench to Validate CPU Overclocking
Cinebench is widely regarded as one of the best real-world tools for checking overclock stability and performance gains.
Steps to validate your overclock:
- Run Cinebench at stock speeds first and record the scores.
- Apply your overclock settings in the BIOS.
- Run the multi-core test 5–10 times in a loop.
- Monitor CPU temperatures and clock speeds using HWiNFO.
- If scores improve and remain stable with no crashes, your overclock is performing well.
Warning: If you get a high score but the test crashes after 3–4 runs, the overclock is likely unstable for daily use.
Tech sites such as TechPowerUp, Tom’s Hardware, and Puget Systems often suggest running Cinebench several times to check if an overclock is stable. It gives the CPU a strong, long-lasting test similar to actual professional work.
How to Use Cinebench to Detect Thermal Throttling
Thermal throttling is when your CPU gets too hot and automatically slows itself down to avoid damage. Many people do not realize their CPU is throttling, which means they are getting less performance than they paid for. It combined with a temperature monitor is one of the best ways to catch this problem.
- Download a free temperature monitoring tool. HWiNFO64 is recommended for Windows. iStat Menus works well on macOS.
- Open the temperature monitor and position the window so it is visible alongside Cinebench.
- Start the multi-core test. The 10-minute version in R23 is ideal for this check.
- Watch both CPU temperature and CPU clock speed throughout the test.
Temperature reference points
- Below 80 degrees Celsius: Normal and healthy
- 80 to 90 degrees Celsius: Acceptable for most CPUs under full load
- Above 90 degrees Celsius: Getting hot, cooling improvements should be considered
- Above 100 degrees Celsius: Throttling is almost certainly occurring
Signs of throttling during the test
- CPU clock speed drops noticeably after the first few minutes
- Cinebench score progressively decreases as the test continues
- Temperature hits 100 degrees Celsius or triggers thermal alerts in your monitoring tool
Common fixes for thermal throttling
- Clean dust from your CPU cooler, heatsink fins, and case fans
- Replace dried-out thermal paste between your CPU and cooler
- Upgrade to a larger or more capable CPU cooler
- Improve case airflow by adding intake or exhaust fans
- For laptops, use a cooling pad or reduce power limits in your system settings
How to Use Cinebench Before and After a Hardware Upgrade
It is one of the most practical tools for measuring whether a hardware upgrade actually improved your system and by how much.
Before the upgrade
- Run the single-core test and record the score
- Run the multi-core test and record the score
- Run the GPU test if applicable and record the score
- Take a screenshot of all results
After installing the upgrade
- Update all drivers, especially GPU drivers and chipset drivers
- Run the same tests in the same version of Cinebench
- Compare the new scores against the recorded pre-upgrade scores
Calculating the improvement
Divide your new score by your old score, subtract 1, and multiply by 100 to get the percentage gain. For example, a multi-core score jumping from 12,000 to 21,600 represents an 80% improvement. That kind of measurable, concrete data removes all guesswork from evaluating an upgrade.
This method is particularly useful when upgrading:
- A CPU (to verify the new chip performs as expected)
- A CPU cooler (to check if throttling has been reduced or eliminated)
- Adding more RAM (to see if memory was a bottleneck)
- A GPU (to measure rendering speed improvements for creative work)
Cinebench 2026 vs 2024 vs R23: Side-by-Side Comparison
How Cinebench Compares to Other Benchmark Tools
Cinebench vs Geekbench
Geekbench checks how a CPU works in many tasks like security, file packing, and memory use. Another test focuses on making 3D images. This helps people who do art or design. For a simple look at overall CPU power, using both tests is helpful.
Cinebench vs Blender Benchmark
Blender has its own test that uses a real image maker. This test is good for people who use Blender. Running both tests gives a better view of how your computer works. One test also has many public scores, so it is easier to compare with other systems.
Cinebench vs 3DMark
3DMark tests how well a graphics card runs games, like speed, light effects, and new features. Another test checks how fast a computer can make images, not play games. These tests do different jobs and work well together.
Why Cinebench Test Tool Won’t Launch – Complete Troubleshooting Guide
The program sometimes refuses to open. Here are the most common reasons and quick fixes you can try right now.
Close other monitoring tools
Many people fix the problem by closing programs like MSI Afterburner and RivaTuner.
- Press Ctrl + Shift + Esc to open Task Manager.
- Look for Afterburner or RTSS and end those tasks.
- Now try opening the program again.
Remove old saved files
Old leftover files can stop it from starting.
- Go to your Documents folder.
- Find and delete the Maxon folder (or the folder inside it).
- Restart your computer and try again.
Run it as administrator
- Right-click the program icon.
- Choose “Run as administrator”.
If that does not work, right-click again, go to Properties, and try compatibility mode for Windows 10.
Get a fresh copy
- Uninstall the current version.
- Download the newest one from the official Maxon website.
- The version from the Microsoft Store often works better.
Update your graphics drivers
Old or broken graphics drivers can cause problems.
Download the latest drivers from NVIDIA, AMD, or Intel website and install them.
Extra tips
- Turn off your antivirus for a short test.
- Make sure Windows is fully updated.
- If nothing helps, tell me: which Windows version you use, and whether any error message appears.
Try the first two steps first. Most people get it working with these simple changes. Let me know what happens!
Cinebench GPU Test Keeps Crashing? Here’s What to Do
The GPU test in newer versions can sometimes fail or show errors. Common reasons include not enough video memory, old drivers, or too many programs using the graphics card.
Quick solutions:
- Make sure your graphics card has at least 6 GB of VRAM.
- Close all other programs (especially browsers and Discord).
- Update to the latest graphics drivers.
- Restart your computer before running the test.
Laptops and entry-level graphics cards often struggle with this test,that’s normal.
What’s New in Cinebench 2026 and When to Upgrade
Latest update brings a much heavier workload, a unified test scene for both CPU and GPU, better support for new hardware, and improved results for modern systems.
Choose the 2026 version if you have a recent PC or Mac and want scores that match the latest reviews.
Stick with older versions (2024 or R23) if you need to compare with many existing results or if your system has limited memory.
Cinebench Crashes During the Test? How to Find the Real Problem
The app crashes while running typically signal overheating or driver conflicts.
Helpful checks:
- Monitor your CPU temperature and clock speed during the test.
- Watch for sudden drops in performance or temperatures above 95°C.
- Run the test a few times to see if the crash is consistent.
Cleaning dust, reapplying thermal paste, or improving airflow often solves these issues.
These headings feel natural, helpful, and easy for both readers and search engines. They avoid repetition of “Cinebench” inside the content while keeping it only in the headings as requested.
Final Thoughts
The application is one of the most useful free tools available for any PC or Mac owner. It gives you real, meaningful performance data based on actual rendering workloads rather than artificial test conditions. The results are trustworthy, repeatable, and easy to compare with millions of other systems worldwide.
You can use this test to check if your new PC works well, find heat problems, see how upgrades help, or just learn about your hardware. It gives clear answers fast and is free.
You can download it from the Microsoft Store or the official website. Run the test and look at the numbers to understand your PC better. Your computer can tell you a lot, and this tool helps you see it.
Frequently Asked Questions
Is Cinebench completely safe to download and use?
Yes. the application is developed and published by Maxon, a legitimate and well-established software company. Downloading from the Microsoft Store or directly from maxon.net guarantees you are getting the authentic, unmodified version.
Will running Cinebench damage my CPU or GPU?
No. The load application applies is the same kind your CPU handles during real rendering work. Modern CPUs protect themselves from damage by throttling or shutting down if temperatures become dangerous. It does not bypass any of these protections.
Why is my score lower than reviews I read online?
Several factors can explain the gap. Different Cinebench versions produce incomparable scores. Power settings in Windows (especially Power Saver mode) reduce CPU speed. Thermal throttling limits performance under load. Background applications consume CPU resources. Laptop results are typically lower than desktop results even with the same CPU model, due to stricter thermal and power limits in laptops.
Can Cinebench run on a laptop?
Yes, fully. Just plug in the laptop before running the test and close background apps. Expect scores to be somewhat lower than the equivalent desktop CPU due to how laptops manage heat and power.
How often should someone run Cinebench?
There is no fixed schedule. Most people run it after building or upgrading a PC, after applying new thermal paste, when suspecting a performance problem, or when evaluating a new laptop purchase before the return window closes.
Does Cinebench use all cores?
This test makes your CPU work as hard as it can for a long time. All parts of your processor run at full speed at once, seen in big programs Cinema 4D. It checks if your CPU fan and cooler can keep it from getting too hot.
Can Cinebench scores be used to predict gaming performance?
Single-core scores have a moderate correlation with gaming performance, since many games are sensitive to single-core CPU speed. Multi-core scores matter more for games that use many threads, and for tasks like streaming while gaming. The GPU test measures rendering, not gaming frame rates, so it should not be used as a gaming GPU benchmark. Use 3DMark for gaming-specific GPU benchmarks.

Written by Jake Thompson
Jake Thompson is a PC hardware enthusiast who has been testing CPUs and GPUs for over 10 years. He uses tools like Cinebench, 3DMark, and Blender Benchmark to check real performance. He explains everything in a simple way so beginners can understand easily.